

How To Merge A Face In Photoshop
How to Swap Faces in Photoshop
- Open up your image files in Photoshop
- Select the face you want in your last photo
- Copy the image
- Paste the image
- Resize the image
- Re-create your background layer
- Create a clipping mask
- Create a slight overlap of the confront with the body
- Delete the face up from the body layer
- Select the body and face layers
The Photoshop face swap is an image-editing technique that allows you to essentially swap faces of different people using Photoshop. The Photoshop face swap technique is especially useful for ecommerce brands who want to make the most of their production photography investments.
There are many reasons you lot'd want to do a Photoshop face swap, including:
- Adding diverseness to the models featured in your product photos (remember, consumers like to see people who look like them)
- Using a shot where everything but the model's confront was in the right position
- Making an unhappy or aroused kid happy again
In this article, we'll learn the Photoshop face swap and blend technique in merely 10 like shooting fish in a barrel steps.
Receive free ecommerce & production photography tips
Editor's note: We're using Photoshop 2018 Artistic Cloud. For other versions, the steps may vary.
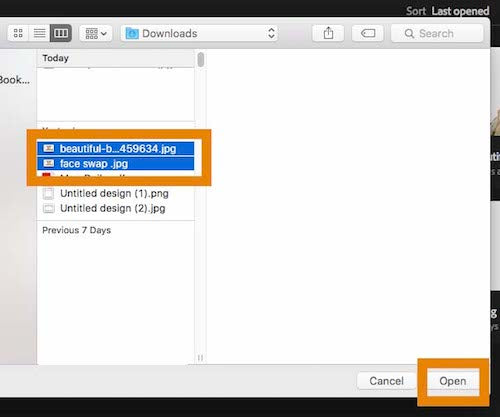
Step 1: Open your image files in Photoshop
Open the ii headshots in Photoshop by clicking File and selecting Open from the dropdown menu. It'll open a new window where you can select the photos.

You lot can select both by belongings the CTRL key (Command on a Mac) while you click the 2d file.
Stride 2: Select the face you lot want in your final photo
Click on the file tab that corresponds to the face that you want in the final photograph. Select the Lasso Tool by pressing Fifty on the keyboard or selecting it from the tool carte du jour. Carefully trace around the eyebrows, nose and lips.

It's best to select only the almost highlighted portions of the face up and so that y'all tin can swap faces with a more realistic outcome. It'll accept a flashing dotted line around it when you're finished.

Stride 3: Re-create the image
Click CTRL+C (or COMMAND+C for Mac users) to re-create the selection. Make certain the dotted line is withal flashing.
Stride 4: Paste the image
From the tabbed workspaces, select your workspace that contains the face from your original shot that you want to supersede. This will exist your "body" layer. Press CTRL+V (Command+V on Mac) to paste the copied face up to the photograph. Then press CTRL+D (Command+D for Mac users) to deselect the face and remove the flashing line.

Stride five: Resize the prototype
Adjust the layer to 30% opacity so that you tin see beneath the layer. Using CTRL+T (Control+T for Mac), position the confront past lining upwardly the optics and oral fissure, stretching every bit needed to get them to line upwardly as closely as you tin.

To adapt the face up proportionately hold the Shift key and click the box and drag. If you lot hover near the corner, it volition give you rotation toggles that permit you to plough the paradigm.

Getting the faces to line up well will crave some patience, and a little trial and error using your eye to find the position that looks most natural.
In one case you're happy with the placement, press Enter to finalize your placement. This is really important. If you forget to press Enter when you finish, all of your hard work will exist lost.
And so adjust the layer opacity back to 100%.
Step vi: Copy your background layer
Next, you lot'll need to duplicate your background layer. From the layer menu select your background layer. You can right click and select Duplicate Layer or use the keyboard shortcut past pressing CTRL+J (Command+J on Mac).
Rename the re-create layer "trunk" as information technology will make upwards the bulk of your final photo. Go ahead and click on the Visibility Eye to hide the background layer.

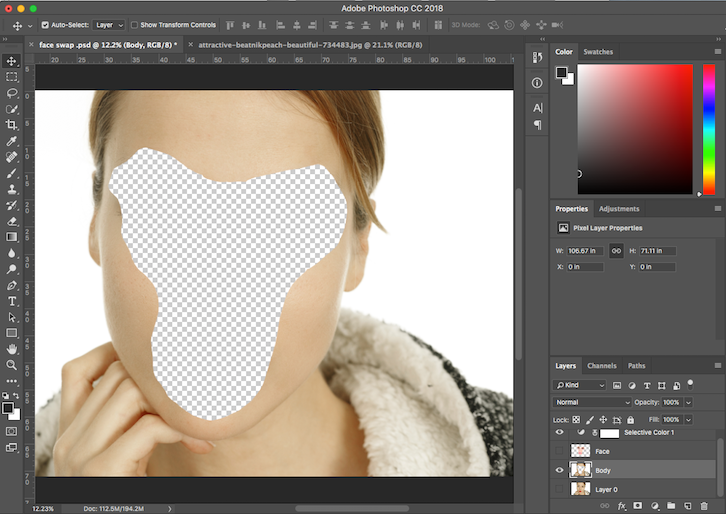
Step 7: Create a clipping mask
Press CTRL (Control on Mac) while clicking the thumbnail of the face layer. This volition select the shape of the face up on all layers.

Select the body layer and click on the Visibility Eye of the face layer to hide it. Later on the background and face layer are subconscious you will only see the layer you have selected.
Step 8: Create a slight overlap of the confront with the body
Go to the Photoshop menu in the header and click Select. Then choose Modify and select Contract.

In the dialogue box, type 10 pixels. This will shrink the clipping mask by 10 pixels which will let the face to overlap the body by a few pixels.

Step 9: Delete the face up from the torso layer
While the body layer is notwithstanding selected, pressDelete or Backspace to remove the surface area beneath the confront. Press CTRL+D (Command+D on Mac) to deselect.
Stride ten: Select the body and face up layers
Become to Edit in the Photoshop carte du jour. Select Car-Alloy Layers from the dropdown carte.

A box will pop up (see screenshot below). Select Panorama and check the box for Seamless Tones and Colors and Content Enlightened Fill Transparent Areas before clicking OK.

Hither'south what yous'll be looking at:

And your last image should like this:

How Do You lot Change Skin Color in Photoshop?
There are several techniques you can employ to change skin colour in Photoshop. We recommend first using the machine-alloy function and selecting the naturally highlighted areas of the face. This makes the blending expect more natural even in cases where the tones may non match perfectly.
If y'all need to change the skin color for your Photoshop face up swap, instead of following Step 10 in the tutorial, yous could also attempt 1 of the following:
- Assess the divergence in brightness and color of the two images. Then using Hue, Saturation, Brightness and a Layer Mask yous tin accommodate each i independently until yous reach the desired tone.
- Another option is to employ the Selective Color Mask. This technique uses a layer mask to protect the areas that exercise not need colour aligning. It alters the CMYK and RGB colors of the layers until they match.
- A third method is to employ the Curves function with a Layer Mask to protect areas that do non need colour aligning.
What Is the Layer Mask in Photoshop?
You employ a Layer Mask in Photoshop to select only parts of an paradigm. The Layer Mask hides portions of your photograph from being seen. That's why it's helpful in the Photoshop face swap: It preserves parts of the original face up while replacing other parts of the face with a different one.
Photoshop automatically creates the Layer Mask as a function of the Auto-Alloy characteristic.
The Layer Mask uses black and white to denote areas of exposure. The white areas are exposed and the blackness areas are not. Additionally, you can use the Paintbrush tool to apply white or black to the prototype for ameliorate precision.
At that place are other uses for the Layer Mask, such equally removing an element or object from an image or superimposing multiple images together.
Using the Photoshop Face up Bandy Technique in Product Photos
The Photoshop face swap technique can be applied to other scenarios, more than than just switching faces. For ecommerce product photography in particular, the Photoshop face swap has a few potential uses. This means yous can more easily get varied product photos for a smaller investment.
For example:
- For jewelry product photography, you tin swap out stones, pendants or gems
- In apparel, you can switch the designs on a t-shirt

- When you have lifestyle photos with models, yous tin can use the Photoshop face swap to alter their hairstyles
- Y'all can modify the graphic on a mug or pint drinking glass
- Modify the labels on drink bottles, cardboard boxes of food, and other food-related items

Don't take time to do it all yourself? Nosotros can apply the Photoshop confront swap technique to your product photos for you.
Learn more about our image masking photo-editing services and get a quote in 45 minutes or less

Source: https://pathedits.com/blogs/tips/photoshop-image-swap-blend-technique-10-easy-steps
Posted by: phelpsbegany.blogspot.com
0 Response to "How To Merge A Face In Photoshop"
Post a Comment